Saving is not automatic. Remember to save your changes regularly (save tab at the top right of your back-office screen) to avoid losing your work.
To add a quiz, click on the Quiz tab in the interactivity category.

Quiz content
The "New quiz" window allows you to start creating your quiz. You need to give your quiz a title. You can also add a description (not mandatory for the creation of your quiz). Once you've done this, press "Create" to generate the quiz.
Click on the newly created window to set up your quiz.
-png.png?width=688&height=391&name=Capture%20d%E2%80%99%C3%A9cran%202023-06-13%20%C3%A0%2009-59-27(1)-png.png)
- You have two choices: Stand-alone quiz or live quiz
The stand-alone quiz can be completed by the participant at any time in the form of individual sessions.
By checking the stand-alone quiz box, several options appear:

- "Show correct answer" indicates to the participant whether the answer he has given is correct.
- "Show score" indicates the number of points earned. You can award points for each question to create a ranking.
- "Allow to restart" allows the participant to restart the quiz.
Live quiz is the default option. It applies if you do not check the stand-alone quiz box.
To access this type of quiz, participants need an identification PIN code, which you'll need to give them beforehand (see PIN code).
Add questions to your quiz
To add a new question to your quiz, click and write directly in the "New question" text field:

Once you've written your question, a tab appears allowing you to choose the question format. Several formats are available:

MCQ
The MCQ is the default format. Once you've asked your question, you'll need to define how you want to answer it. You have 3 choices:
- Only one possible answerwill appear
- Several possible answers
- More than one correct answer.
The MCQ allows you to apply one or more correct answers to a question.
- Vote
Voting allows participants to give their opinion on a question. You can give the option of applying one or more possible answers. It is not possible to apply a correct answer to this type of question. We only ask for the participant's opinion.
- Only one correct answer
Write down your different answers, then click on the ✓ symbol corresponding to the correct answer.
- Add an explanation
You can also add an explanation, which the participant will see after answering the question.
- Form
This element allows you to collect several elements about a participant in a single question. The participant will have several fields displayed, and will be asked to fill in the information requested.
- Several correct answers
Write down your different answers, then click on the ✓ symbol corresponding to the different correct answers.
- MQC Image
This format lets you create an MCQ with pictorial answers.
Drag and drop the images you want. You can add captions. Tick the correct answer(s), like this.
With this type of quiz, you can choose one or more correct answers.
- Vote Image
Image voting works in the same way as simple voting. The difference is that you can add images to the various proposals.
- Free response scaleéchelle
In the free response, you also have the option of applying a correct answer.
The difference is that you don't give any suggestions. The participant will have to indicate his or her own answer.
You have the option of proposing answers in figures or text.
- Multiple text
Multiple text allows the participant to add several response elements. For example, you could ask the participant which 3 elements made the biggest impression on him/her during session 1.
The participant can then add several answers using a "+".
- Scale
The scale allows participants to give their opinion on a chosen subject. For example, they can indicate their level of satisfaction on a scale of 1 to 5.
You can specify the size of the scale, including a minimum and maximum value.
- Word cloud
The word cloud lets you ask participants to answer a question with a single word.
You can apply a default word list, or let the participant choose the word he or she wishes.
You also have the option of displaying the answers in real time, or applying moderation, which lets you use the moderator link to decide whether or not to display the different words on the slide.
- Open question
Write the title of your question and select "Free answer". Then define the heading to be displayed in the text field. Finally, define whether it's a text or a number, then enter the corresponding correct answer.
You can also add an explanation, which the participant will see after answering the question.
- Title
The title element allows you to apply a title to the participant's screen. This element can be used, for example, to categorize questions.
- Information
The information allows the participant to access a free text field and answer the question as they wish.
Design
You can change the design of your quiz directly on the configuration screen.
- Modify the main color by typing the color code you want in the "main color" field.
- You can also insert your event's logo by dragging or exporting it in the dedicated "Logo" space.
Texts
You can also modify the text that appears in the buttons, as well as the validation and end of quiz messages. To do this, click on the "Texts" tab under the name of your quiz.
You can then modify all the texts visible to the participant:
- Startup message
- Validation message
- Congratulations message
- Go to next question
- Score display
- Retry button
Results

The "Results" tab displays participants' results, by day. The top 3 are ranked "Gold", "Silver" and "Bronze". You can then see the participants' first and last names, their score and the time taken to answer the quiz.
If you give the possibility to earn points, it will not be possible to display the ranking.
Add quiz to application
Once you've completed all the above steps, you can add the quiz to the mobile application. The process varies depending on whether you have chosen a stand-alone quiz or a live quiz.
Adding and using a live quiz
Once you've added your quiz to the application, you'll have three links to set up your quiz and use it live.

- The moderator link
Allows the organizer to launch the quiz at any time and scroll through the questions.
You can choose to scroll through the quiz questions automatically (by pressing 'Autoplay') or by hand, choosing to display the results each time.
When a moderator displays a question, they can no longer hide it. Be careful to respect the "go" and make sure you're displaying the right question. Once posted, it will no longer be possible to hide it.
- The slides link
It corresponds to the different quiz slides that you can.
As a customer, you can't change the design of the slide mode. You'll need to get in touch with your project manager to discuss the desired design.
- Participant link
You can add the link as an iframe wherever you like on the application.
The participant will then be presented with a 'Quiz' screen, where a PIN is required to start the quiz.
Participants cannot change their answers in live quiz modeapparaître
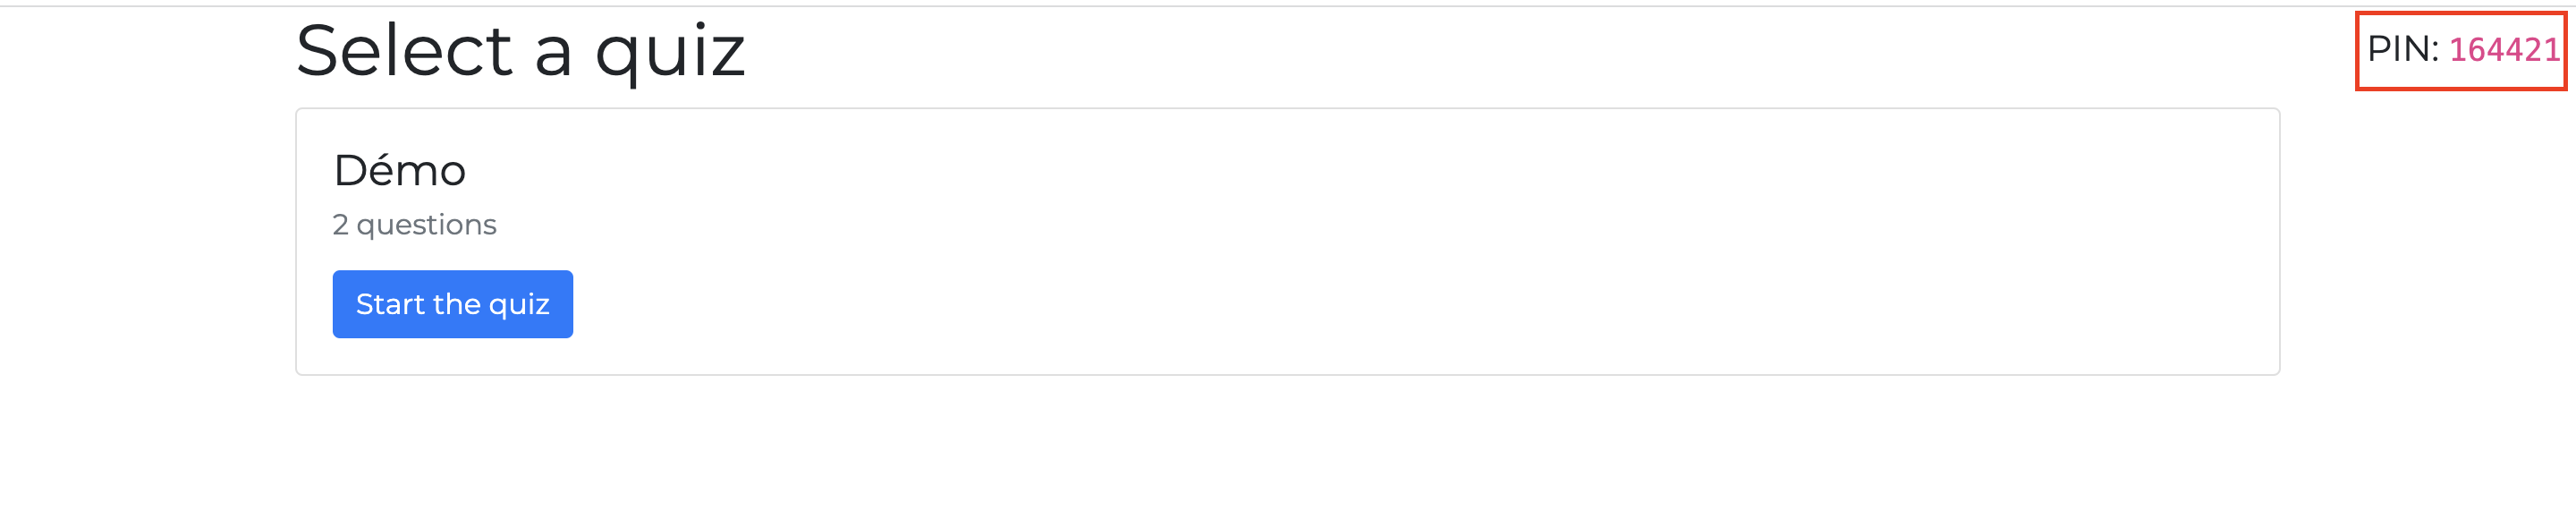
- PIN code
To obtain the quiz PIN and launch it, click on the moderator link. Select the quiz you wish to launch.
The PIN code for this session is displayed in the top right-hand corner of the screen. Give it to your participants, who will then be able to access the quiz.
Generate questions
This element allows you to automatically generate a quiz using chat gpt. In subject, you can then apply a summary of the quiz you want, then the number of questions to be asked and the language in which they should appear.
By clicking on generate, a quiz will automatically be created based on the elements you have requested. You can make changes to the quiz at any time.