General
To access data integration for workshops, simply click on the "Workshops" module, whose name may vary according to your request (e.g. Agenda, Program).
You will then be taken to your workshop configuration. Here you'll find several items of information:
- (1) This data corresponds to the number of workshops you have entered in the back office.
- (2) This button allows you to search among all workshops.
- (3) This button allows you to filter among all workshops by adding one or more conditions.
- (4) This button lets you add a workshop.
- (5) This drop-down menu allows you to choose the configuration language.
- (6) This button allows you to download all workshop information in EXCEL format.
- (8) This button lets you import from an EXCEL file.
- (9) This button allows you to update your workshops from an EXCEL file. Only sessions already imported will be updated.

Adding a Workshop
When you add a workshop, you have the option of entering a certain amount of information:
- (1) The "Publish" button lets you decide whether or not to display the selected workshop on the platform.
- (2) This button allows you to make a workshop visible to a certain type of participant. When
a workshop is created, it is visible to all participants by default. - (3) This option allows you to register all participants for this workshop by default, without
giving them the option of unsubscribing. - (4) This drop-down menu lets you choose which type, session/category or workshop best identifies you.
- (5) This image integration lets you add an image to your workshop thumbnail.
- (6) The "Title" field lets you give your workshop a title.
- (6) The "Slug" field is used to integrate a word or short phrase at the end of the link that will be visible in the platform URL once the participant is on the Workshop page.
- (7) The slug corresponds to the url path if the workshop is to have a dedicated page. Example: appcraft.fr/programme/atelier-rse
- (8) The "Short description" field lets you enter a short description to quickly explain the workshop.
- (9) The "Description" field lets you enter a full description of your workshop.
- (10) The speaker drop-down menu lets you choose the speaker for your workshop.
- (11) The "Partner" drop-down menu lets you choose the exhibitor partnering the workshop.
- (12) The "Location" field is used to display a location where the workshop can take place at your event.

Other possible options
This button allows you to make a workshop compulsory for certain participants, depending on the fields present in the listing.

This button makes the time slot compulsory. This means that, in the workshop time slot, the participant is obliged to register for a workshop.
Live and session management
Workshop
- (1) URL: here you can add the workshop broadcast link
- (2) Pre-Live image: here you can add a waiting card for your live event
- (3) Poste-Live image: here you can add a card that will be displayed when the live event is over
- (4) Files: here you can add one or more files related to the workshop
- (5) Replays: here you can add a video player offering a replay of the workshop
- (6) Feedbacks: here you can add a feedback link related to the workshop.
- (7) Sessions: you can add different sessions to a workshop. This makes it possible, for example, to have a workshop repeated several times, without having the same workshop displayed several times.

Session
- (1) To add a session, click on the "+", which will open a pop-up window with the session fields to be filled in.
- (2) Start date: this corresponds to the start date and time of your session.
- (3) End date: the date and time your session ends
- (4) Duration: the duration of your session is automatically calculated according to the "startDate" and "endDate".
- (5) Quota: this is where you can set a registration quota for your session, if you wish.
- (6) Live URL: you need to integrate your live link in this cell so that it can be connected.

If you have any doubts or questions about filling in sessions or setting up lives for your event, please get in touch with your dedicated project manager.
Other tabs
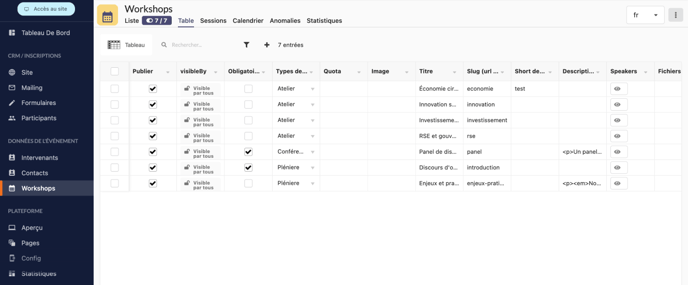
Table
Here you'll find the various workshops in "table" format, and you can also edit the information in this table.
Session
Here you'll find the workshop sessions in a table view. You can edit them directly from this table.

Calendar
The calendar view lets you preview the breakdown of your program once it has been entered in the back office.

Anomalies
This tab allows you to be alerted when there are potential anomalies in session creation, e.g. missing live link, impossible start/end time, etc.

Statistics
The Statistics tab contains all program-related statistics, including session registrations, number of attendees, unique registrations, etc.
